Showing posts with label diy. Show all posts

March 4, 2014

norah turns one.

on saturday, we had a little celebration for the birthday girl.

this little girl is so precious to us.

love.

(a special thanks to misi photo for capturing our sweet girl's special day!)

August 16, 2013

house tour {update}: master bedroom.


i've been wanting to share an updated house tour with you guys for awhile now, but have kept putting it off. the reality is, the idea of it overwhelmed me--i haven't gotten nearly as much done as i'd liked, and the house is never clean at the same time. but the other day it came to me that i didn't have to photograph and share the whole house (or large sections of it) at once. duh.

so, as a way to chronicle our lives in this sweet little house, and in honor of us approaching our third anniversary of moving here (yes--it's been three years!), i'll be doing a short series on what it looks like around here now. it will probably be sporadic, short and sweet, not terribly impressive, and probably only one room at a time.

but such is life, right?
___

the funny thing about our room is, we've ended up changing things around half a dozen times, having additional people staying with us, having a baby in a bassinet, and things like that.

but now, it looks pretty much the same as it did last time i showed you all. haha.

my husband is so talented--he did all of the photographs/design work shown above. the reality of being the wife of a photographer/designer is that you tend hardly have any photos of your family, or other art from said designer. but the perks are, when they get a chance, you get beautiful things.

oh, and a side note: that photo on our dresser is from coen's room. he snuck in the other day and switched them, to put the photo of nick and i next to his bed. he is so sweet.

we still have quite a lot of work to do in our room, as well as figuring out the best way to utilize the space. but for now, it's working, and it's a light and airy part of our home. i love it.

love.

November 12, 2012

DIY dry shampoo.

This is a quick and simple DIY that I'm excited to share with you. I don't know why it's taken me so long to try it, but now that I have, I'm hooked. And sorry in advance for such a long post on hair. It's a big deal these days. haha.

I have really thick, really long hair. Like, almost all the way down my back long. And I can't justify spending a ton of money on a good haircut right now, so long it will stay. It's also quite a pain to wash and it takes almost a whole day to dry (or an hour to blow dry, but that never happens). Plus, who has time for such time-consuming beauty regimens when you have a toddler and a quickly-expanding midsection?

I've been reading about dry shampoo for awhile now, and the whole concept of only washing once or twice a week. Last year, I tried the "no-poo" method for a few months. It didn't work for me, so I've settled for using sulfate-free shampoo. But I never gave up hope that even my oily roots could eventually last more than two days without washing. And slowly, I've been stretching out my washings. But it's been hard without having something to help on the in between days.

A few months ago, I bought one of the aerosol dry shampoos on the market. Ew.

Last week I finally made my own dry shampoo and it worked like a charm! And by charm I mean, I went almost six days between washings. I am so excited.


DIY: Dry Shampoo

What you need
one old shaker spice jar (washed thoroughly to remove smell)
1/4 cup cornstarch
1/4 cup baking soda
2-3 drops lavender essential oil (optional)

What you do
Combine cornstarch and baking soda. Mix well and pour into jar.

How you use it
Shake about a teaspoon into your hand. Flip your hair over and lightly rub mixture between your palms, then rub into your scalp and roots. I've found keeping my head down allows for me to get all around my head much more easily.

Once you've rubbed it in, allow to sit for a minute or two to absorb oils. Brush out with a fine-tooth comb.

*For darker hair, add cocoa powder to darken the color.

Enjoy (fewer washings, that is)! :)

love.

June 7, 2012

diy: yarn & felt wreath.

i've been seeing all kinds of these beauties since last year, and have been waiting just as long to make my own. i've even had all my supplies for months.

it was worth the wait, though. i love it.


maybe eventually i'll get the hang of taking step-by-step pictures of my crafts. but for now, i get too engrossed in trying to figure out what i'm doing to take a minute to snap any photos. these are the best i've got. at least it sets the scene for you, if nothing else.

yes, you've seen this photo before. 
one of my crafting buddies.
dear crafty friends: please show me how to wind my yarn so this doesn't keep happening?
eventually, i finished it.


yarn & felt wreath
what you need
one skein of yarn
felt squares
hot glue gun
straw wreath (these are my favorite because they are fat and super cheap)

what i did
1. glue the end of your yarn onto the back of the wreath. start wrapping, as tightly as you can.

2. continue wrapping until the entire wreath is covered, adjusting as needed. cut yarn and glue end to the back.

3. to make the flowers, take a felt square and cut out a large oval for bigger roses, and medium oval for smaller sizes. *note: cutting it in an oval shape will give the petals a more defined look, like in the photo above). if you'd prefer a more modern rosette shape, cut a circle. 

4. starting on an end, cut the oval into one long strip, cutting in a spiral pattern.

5. starting at an end, roll up the strip, adjusting as you go to make sure it's a secure roll and the petals fall where you want them. hot glue the end of the strip down to secure.

6. repeat in different colors and sizes until you have your desired number.

7. once you know where you want to place the flowers, hot glue along their bottoms, making sure you glue a few layers, and press them onto the wreath. repeat until finished.

8. hang it up. we nailed a tiny nail into the wood frame of the window and hung the wreath directly on it. you can also use a ribbon or fabric and secure it to the top of your door.

this porch is starting to look like summer.

love.

May 24, 2012

diy: yarn-wrapped letter.

let me share my first of two projects i finished this weekend. it's been on my list for months, so i'm pretty excited about it.

not the best picture, but i hope you get the idea. haha.
this was harder than i thought it was going to be. i looked up a few different directions online & it looked so simple that i thought it would breeze through it. most directions were just to the effect of wrap, wrap, wrap and glue.

not so much. although if you're an expert with the hot glue gun, you might not want to listen to me--i'm not an experienced crafter by any means. but, if you need a little extra explanation, this is for you.

you only need half of these (wreath instructions will be coming next). though, i consider coffee & LOtR are necessities. 
yarn-wrapped letter
---
what you need
hot glue gun & glue sticks
any letter style of your choice (michaels has tons of options, though i like that this letter has a cutout to hang it in the back. it makes life that much easier.)
a small skein of yarn (that's what it's called, right?)

what i did
1. plug in your glue gun & let it warm up. simple, yes, but i don't remember these things.

2. glue the first edge of yarn down on an end.

3. start wrapping, keeping it as taught as possible. try to cover as much of the end as you can--keep in mind, you're going to have to go different ways to cover the different sides & ends.

4. on the edges, you'll need to dab some glue to keep the yarn in place. do this as much as you need to, because you'll be wrapping over some of it later on.

5. continue wrapping around the rest of the letter, dabbing glue on odd spots as necessary.

6. repeat what you did on the first corner on the other corner(s). the main goal at this point is to cover all the letter with yarn as neatly as possible.

7. once that is done, now for the aesthetics. at the opposite end of the letter, tightly wrap over the edges in the same direction (see the photo above to see how i did it). this does take some trial and error, but don't give up. just find the best way to cover all around neatly, and glue some of it to keep it in place.

8. sparingly wrap your way back around the letter to the other end(s). since it's all wrapped tightly, it will blend it with the yarn.

9. repeat the patterns you came up with for the first end until everything is neat & pretty. snip the yarn, and glue that sucker down.

10. if there are some loose pieces, just glue underneath them and place them where you want them.

11. if you want to add embellishments, now's the time to do it.

12. hang your masterpiece & pat yourself on the back. you did it.


love.

March 29, 2012

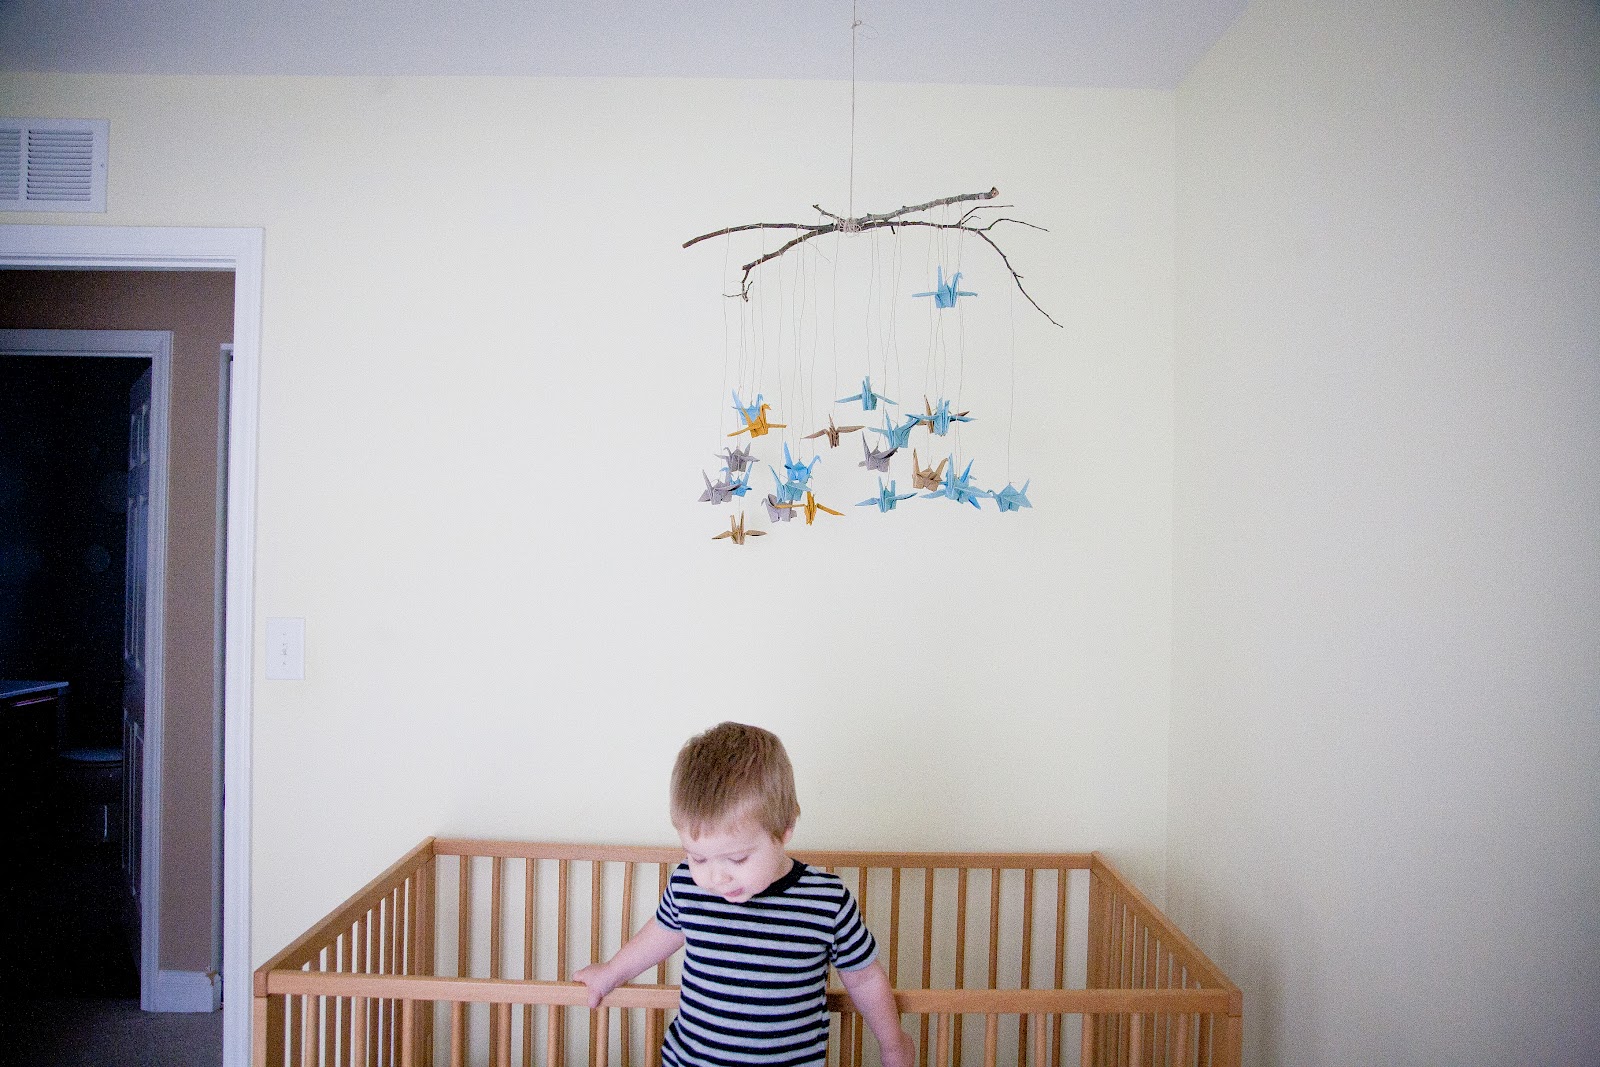
diy: origami bird mobile

i finally finished the new mobile for c.'s room!


this is long overdue. let me show you why.

remember this?

 and remember the sweet, thankful baby enjoying his new bird friends? well, the baby is now a toddler. and this toddler did this to his friends.


like i said. long overdue.

i spent a long time trying to figure out what to replace the mobile with. i wanted something that i could do myself, but didn't want to just make a new version of the old one. was having a hard time finding something that was a little less "babyish" & that would instead age well with c.

thanks to pinterest, i found this. & then i found this. & then i found a stick in our front yard.

i think it turned out pretty great. 


of course, i had a great helper.


i think he likes it.


origami bird mobile
what you need
5-6 sheets large scrapbook paper, colors of your choice
a branch, dried out and cleaned off
twine of some sort (i used hemp jewelry twine)
ruler & pencil
scissors
pushpin

what i did
1. since i wanted a lot of birds, i cut the scrapbook paper into four perfect squares (using the ruler & scissors). then, i followed this lovely tutorial to figure out what in the world i was doing. don't worry, after like the 7th, you start to get the hang of it. :)

2. once the birds are done, cut the branch and bind it in the way you want it. 

3. taking a pushpin, poke a hole in the top of each crane's back, large enough for your twine to fit through. feed the twine through each, tie it off, and cut about a foot up from there.

4. then, string each bird onto the branch, making sure to give enough space between. tie them on in alternating lengths.

5. finally, make sure all ties are tight, snip off excess twine. hang & enjoy!


love.

December 4, 2011

diy: christmas wreath.

when i opened the box full of christmas decorations this year, my wreath was the first thing to meet me. i had forgotten how much i loved it. i made it last year, and was excited to be able to enjoy it again this year. see how cute it is?


i've never considered myself a crafty person, so this was a triumph. perhaps that's why i love it so much. and, it was soo easy, way cheaper than any pre-made wreaths i had priced out, and matches our red and blue christmas theme.

because it's so cheap and easy, i wanted to share how i made it, in case you're in the market for a christmas wreath, too.


1. to my surprise, i was able to find everything i needed at target (save the glue gun, provided by the lovely hannah), and for a great price. since you're gluing big christmas balls onto it, you can buy one of the small, scrawny fake wreaths for just a few dollars. and they usually have tubes of fun ornaments in the dollar section.

2. once you have all of your supplies, spread out the greenery so that it's full and bushy looking (it will look a little flat in front, but that's okay).

3. use the hot glue gun to put glue on the top side of the ornaments, so the metal tops won't show. then, place the ornaments in a random order all around the wreath, putting pressure on them until they dry.


4. once the ornaments are securely in place, fluff the rest of the greenery to fill in between them. then hang it, and admire your lovely work. 

enjoy! and merry christmastime! love. 

July 18, 2011

better after.

for this before&after, all credit is due to my incredibly crafty husband. he very graciously took the lead on this project (i fear the truth is, if it were left to me it would still be sitting on the floor). he even took these pictures for me.

here's a peek at the before:


this picture actually makes it look like it's in pretty good condition. but, it wasn't. it had a lot of potential, but it wasn't quite there, due to lots of dust, dings, scrapes & general old age. after a bit of washing, spray painting (our new favorite medium) & shattering, it now looks like this:


yes, i said shattering. in an effort to place the thin, old glass back in the frame, it shattered. it was a lovely surprise to find that it looks even better without the glass, letting the glossy print have a bit of the stage against the matte mat. 

well, there you have it. success.

love.

September 30, 2010

Birds on a string.

i don't see myself as a crafty person. creative? sometimes. artsy? sure. but the other night changed that perception (even if only momentarily). observe the finished product:
i made a mobile for the nursery! i've been wanting to do it for a while now, as the only mobile i could find that we loved was $60 and made of cardstock (no, thanks). and, aided by the lovely--and very crafty--hannah, this one came out even better!

a shout out must go to martha stewart. i never thought id actually be one for applauding her ideas, but she really nailed it. if i'd thought more about it, i would have done this during the day and documented it in pictures, but there are instructions that are just as good here.

i did decide to tweak it a bit, though. as the baby enjoying this is no girl, I opted out of the flowers and we just cut small light green leaves to cover the fishing wire. and since the base color scheme of the nursery is black and white (and the like), i went with gray and white for the birds. if you can't tell from the picture, three birds are solid gray and two are white with gray wings and tails.

he likes it.

in fact, i think it's safe to say he loves it. i'm pretty sure he fell asleep chatting with his new friends, and he woke up this morning to finish the conversation (this conversation included quite a few raspberries, as that is his newest form of communication).

this makes for one very, very happy mommy.
love.